Category: Mikrotik

Welcome to the Mikrotik category, a comprehensive resource for anyone looking to master Mikrotik networking solutions. Designed with IT students, professionals, and networking enthusiasts in mind. This section provides free guides on everything from basic configurations to advanced networking in using Mikrotik. Here, everyone can learn and grow their networking skills at any time. Getting Started with Mikrotik: Start with perfect for beginners. Who are new to Mikrotik and want clear, step-by-step guidance. Here, we will show you about Network Setup and Configuration, Mikrotik Security, against threats, including firewall setup, VPN configuration and more.

  • How to Configure PPPoE on a MikroTik Router

    How to Configure PPPoE on a MikroTik Router

    MikroTik routers are powerful networking devices often used in both home and enterprise environments. Your Internet Service Provider (ISP) may supply your internet connection via PPPoE. In that case, configure your MikroTik router as a PPPoE client. This setup is essential. It allows the router to authenticate with your ISP. It also helps establish an internet connection when configuring PPPoE on MikroTik.

    Steps: Configure PPPoE on MikroTik Router

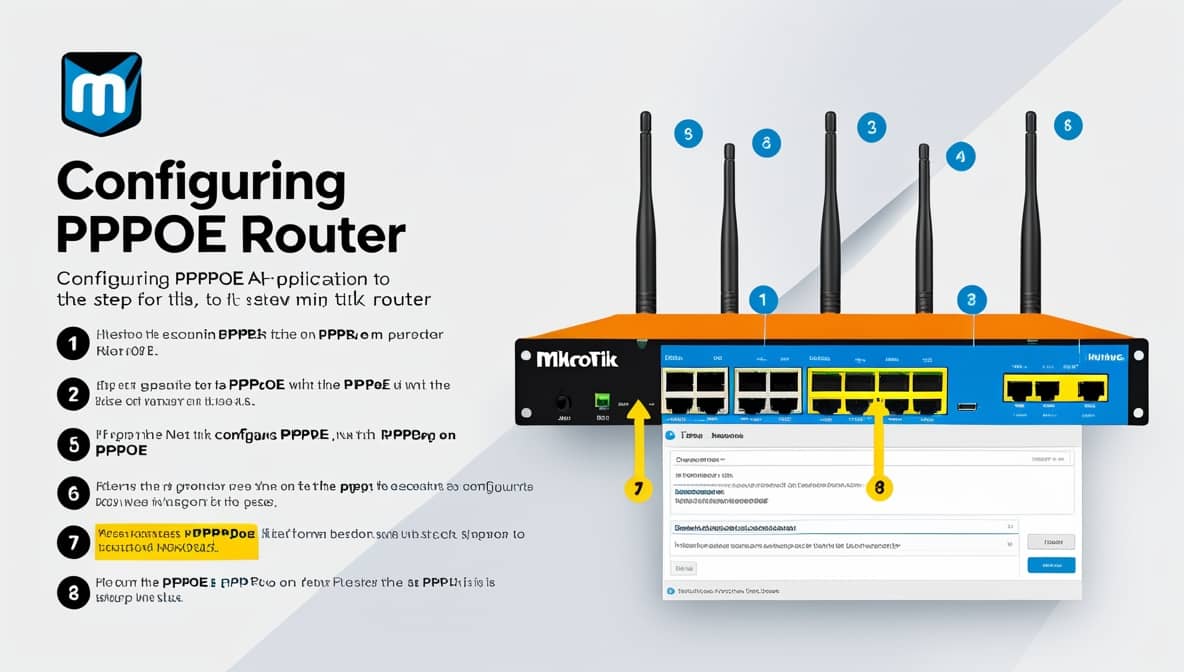
    Follow these steps to configure a PPPoE connection on your MikroTik router. You can use Winbox, WebFig, or the command line (CLI) for this setup. Just ensure you correctly configure PPPoE on the MikroTik interface. If you want to set up the PPPoE account with your computer, these instructions will help you connect it directly.

    Prerequisites:

    • MikroTik router is powered on and accessible.
    • You have administrative access to the router (via Winbox, WebFig, or CLI).
    • Your ISP has provided you with a PPPoE username and password.
    • The internet cable (from your ISP modem or ONU) is connected to Ether1 or your preferred WAN port. Properly configure PPPoE on this MikroTik WAN port.

    Configuration (Use Winbox or WebFig)

    1. Log in to the MikroTik Router

    • Open Winbox or access the router via WebFig (default IP is usually 192.168.88.1).
    • Log in with your username and password (default is admin, no password).

    2. Reset or Check Existing Configuration

    It is (Optional, but recommended for new setup)

    • Go to System > Reset Configuration if starting from scratch (optional).
    • Or check the existing configuration to avoid conflicts. When configuring PPPoE on your MikroTik, this step helps ensure nothing interrupts the setup.

    3. Assign WAN Port (Ether1) to PPPoE

    • Go to Interfaces > Interface List, confirm that ether1 is connected to the ISP.

    4. Configure PPPoE Client

    • Go to PPP > Interface tab.
    • Click the + and select PPPoE Client.
    • Set the following:
      • Name: (e.g., pppoe-out1)
      • Interface: ether1 (or your WAN port)
      • User: Enter the PPPoE username provided by your ISP
      • Password: Enter the PPPoE password
      • Dial On Demand: Unchecked
      • Add Default Route: Checked
      • Use Peer DNS: Checked
    • Click Apply, then OK. Ensuring the client configuration is correct is crucial when you configure PPPoE on a MikroTik interface.

    Then go to Dial Out and enter the PPPoE account and password.

    5. Check PPPoE Connection Status

    • Go to PPP > Interface.
    • You should see your PPPoE client showing a “running” status once connected.

    The PPPoE account has been set up.

    6. Configure NAT (Masquerade)

    • Go to IP > Firewall > NAT.
    • Click + to add a new rule:
      • Chain: srcnat
      • Out. Interface: select your PPPoE interface (e.g., pppoe-out1)
      • Go to the Action tab: set to masquerade which complements your PPPoE configuration on the MikroTik device.
    • Click Apply, then OK.

    7. Verify Internet Access

    • Go to New Terminal or Tools > Ping.
    • Run: ping 8.8.8.8 ping google.com
    • You should receive replies if the connection is working. Successful connectivity indicates you configured PPPoE on the MikroTik correctly.

    Command Line (CLI) Quick Configuration

    For advanced users or scripting:

    /interface pppoe-client add name=pppoe-out1 interface=ether1 user=YOUR_USERNAME password=YOUR_PASSWORD add-default-route=yes use-peer-dns=yes disabled=no
    /ip firewall nat add chain=srcnat out-interface=pppoe-out1 action=masquerade
    

    By following these steps, you have successfully configured your MikroTik router to connect to the internet using a PPPoE connection. This setup enables the router to authenticate with your ISP and route traffic properly through NAT. If the connection fails, double-check your PPPoE credentials, cable connection, and interface settings. Remember, correctly configuring PPPoE on MikroTik ensures reliable internet access.

    Product Review: MikroTik hEX GER

    In a world dominated by wireless everything, there remains a critical need for robust, reliable, and powerful wired networking solutions. A dedicated wired router offers stability and performance. This is true whether it’s for a small office, a server closet, or the core of a sophisticated home network. Wireless devices simply cannot match this.

    [content-egg-block template=offers_list_groups]

    The MikroTik hEX, also known as the RB750Gr3, is a device built precisely for this purpose. This compact, unassuming box packs a serious punch, offering enterprise-grade features and hardware at an astonishingly affordable price point. This review will break down what makes the hEX a standout product for network enthusiasts and professionals alike.

    The MikroTik hEX (RB750Gr3) is a five-port Gigabit Ethernet router. It is designed for locations where pure wired performance and reliability are prioritized. Users also favor its advanced features over wireless connectivity. It is a versatile networking workhorse that excels in a variety of scenarios.

    Key Features & Performance:

    • Powerful Hardware: Don’t let its size or price fool you. The hEX is equipped with a powerful dual-core 880 MHz CPU and 256 MB of RAM. This hardware provides ample processing power for complex routing rules, queue management, and multiple VPN connections without breaking a sweat.
    • Excellent VPN Performance: A standout feature is its IPsec hardware encryption, which can achieve speeds of up to ~470 Mbps. This feature makes it an ideal choice for creating secure, high-speed site-to-site or client-to-site VPN tunnels. Such capabilities are typically found on much more expensive hardware.
    • Enhanced Storage & Monitoring: The inclusion of a microSD slot (a welcome upgrade from previous models) significantly improves read/write speeds. This is crucial for running the Dude network monitoring server package efficiently, as it can store historical data and maps. It also allows for basic file storage capabilities.
    • Comprehensive Physical Features: The device boasts a useful array of physical features:
      • A full-size USB port for additional storage or potentially for 3G/4G modem support.
      • Passive PoE Input (24V). This allows it to be powered via an Ethernet cable. This feature simplifies installation in locations without a convenient power outlet.
      • PCB Temperature and Voltage Monitors provide vital diagnostics to ensure the device is running within safe parameters.
      • A Mode Button for quickly resetting the device or enabling CAPsMAN client mode without needing physical access to the ports.

    Target Audience:

    This router is not designed for the casual user. Its operating system, RouterOS, is incredibly powerful but has a steep learning curve. The hEX is perfect for:

    • Network Professionals and Enthusiasts who need a customizable and powerful router.
    • Small to Medium Businesses requiring a reliable, wired router with advanced VPN capabilities.
    • Home Lab Users looking to learn enterprise networking concepts.
    • Anyone needing a dedicated VPN gateway requires a core router for a network. The network has a separate wireless access point that provides Wi-Fi.

    Pros:

    • Exceptional value for money.
    • Powerful hardware for advanced routing and filtering.
    • High-speed IPsec VPN performance.
    • Compact and fanless design, leading to silent operation.
    • Robust build quality and extensive monitoring features.

    Cons:

    • No built-in Wi-Fi.
    • RouterOS has a very steep learning curve; it is not a consumer-friendly plug-and-play device.
    • The initial configuration can be daunting for beginners.

    Conclusion

    The MikroTik hEX (RB750Gr3) is a testament to the idea that the best tool is often a specialized one. By forgoing wireless functionality, it focuses all its resources on being an exceptionally capable, reliable, and powerful wired router. It offers robust hardware specs and high-speed VPN encryption. Unique features like the Dude server support and microSD expansion enhance its value. These elements make it unparalleled in the networking world.

    Its complexity places it firmly in the hands of advanced users and professionals. However, for those with the knowledge to configure it, the hEX offers impressive performance and features. These can compete with routers costing many times its price. You need raw wired networking power. If you have the skills to harness it, the MikroTik hEX is an easy recommendation.

  • What are the PCQ and QoS on the Mikrotik Router?

    What are the PCQ and QoS on the Mikrotik Router?

    Managing internet speed and ensuring fair access across users or devices is a common challenge in any network. MikroTik routers offer powerful tools to handle this through PCQ (Per Connection Queueing) and QoS (Quality of Service) features. Whether you’re running a home network, office, or ISP-grade infrastructure, understanding PCQ and QoS on Mikrotik is crucial.

    What is PCQ in MikroTik?

    It will help you optimize performance. You can also prevent congestion. Let’s break down what these features are, how they work, and how to apply them effectively on a MikroTik router. PCQ (Per Connection Queue) is a special queue type in MikroTik RouterOS. It is designed to evenly distribute available bandwidth among multiple users or connections. This feature is a crucial aspect of using PCQ and QoS on Mikrotik.

    🔹 Key Features of PCQ:

    • Automatically shares bandwidth fairly.
    • Doesn’t require you to define a specific bandwidth for each user.
    • Ideal for environments with many users (e.g., offices, apartments, public Wi-Fi).

    Example: PCQ in Action

    Goal: Share a 20 Mbps internet connection fairly among all users in the 192.168.88.0/24 subnet reflected in PCQ and QoS on the Mikrotik setup.

    Step 1 – Create PCQ Queue Types:

    /queue type
    add name=pcq-download kind=pcq pcq-classifier=dst-address pcq-rate=5M
    add name=pcq-upload kind=pcq pcq-classifier=src-address pcq-rate=2M
    

    Step 2 – Apply a Simple Queue Using PCQ:

    /queue simple
    add name="Shared Bandwidth" target=192.168.88.0/24 \
     queue=pcq-upload/pcq-download max-limit=20M/20M
    

    🎯 Result: The available bandwidth is automatically and fairly divided among all active users.

    What is QoS in MikroTik?

    QoS (Quality of Service) refers to mechanisms used to prioritize certain types of traffic over others. It ensures that high-priority services, like VoIP or video conferencing, receive the necessary bandwidth. Their performance remains stable, even when the network is under heavy load. This is a savvy use of PCQ and QoS on the Mikrotik.

    🔹 QoS Tools in MikroTik:

    • Mangle Rules: To mark different types of traffic.
    • Queue Trees: To apply bandwidth and priority policies.
    • Priority Levels (1–8): 1 is highest, 8 is lowest.

    Example: QoS in Action

    Goal: Prioritize VoIP traffic over general browsing—another example of employing PCQ and QoS on the Mikrotik.

    Step 1 – Mark VoIP Traffic Using Mangle:

    /ip firewall mangle
    add chain=forward protocol=udp port=5060 action=mark-packet \
     new-packet-mark=voip_traffic passthrough=yes comment="Mark VoIP"
    

    Step 2 – Create a Queue Tree for VoIP with Higher Priority:

    /queue tree
    add name="VoIP Priority" parent=global packet-mark=voip_traffic \
     priority=1 max-limit=2M
    

    🎯 Result: VoIP packets are given top priority on the network, reducing latency and jitter.

    PCQ and QoS are essential tools in MikroTik for creating fair, efficient, and optimized networks. Per Connection Queue helps divide bandwidth evenly among users, while QoS ensures critical services are prioritized. PCQ and QoS on the Mikrotik enhance network performance, whether you’re managing a few devices or a large user base.

    If you’re interested in learning more about MikroTik routers, step-by-step configurations. And advanced network management, be sure to check out more resources and tutorials on [Mikrotik Router]. You go-to source for practical MikroTik knowledge.

    The MikroTik RB4011 is an exceptionally powerful router designed for high-performance networking needs. This router features ten Gigabit Ethernet ports. It also has an SFP+ 10Gbps interface. These features bring unparalleled speed and efficiency to your home or office network. The RB4011 ensures secure and fast data transfer with its IPsec hardware acceleration. This makes it ideal for businesses and tech-savvy users alike.

    Advanced Specifications

    The RB4011 is powered by a robust quad-core Cortex A15 CPU. This is the same processor found in MikroTik’s carrier-grade RB1100AHx4 unit. This powerful CPU, paired with 1GB of RAM, ensures seamless multitasking and efficient handling of heavy-duty network tasks.

    Design and Build Quality

    The MikroTik RB4011 comes in a professional-looking, solid metal enclosure. It has a sleek matte black finish. This makes it not only functional but also aesthetically pleasing. The compact design allows for easy integration into various setups. The included two rackmount ears provide secure installation in a standard 1U rack space.

    Power over Ethernet Capability

    The RB4011 can provide Power over Ethernet (PoE) output on port #10. This is one of its standout features. This allows you to power connected devices without needing additional power cables. This setup makes your network cleaner and more efficient. The PoE input supports passive PoE with a voltage range of 18-57 V. This ensures compatibility with a wide variety of devices.

    Dimensions and Weight

    The MikroTik RB4011 measures 228 x 120 x 30 mm (4.72 x 8.98 x 1.18 inches) and weighs just 1.39 pounds. Its compact size makes it easy to place in tight spaces, while still providing powerful networking capabilities.

    Power Consumption

    With a maximum power consumption of 33 W, the RB4011 is energy-efficient without compromising performance. This makes it a great choice for those looking to minimize their energy footprint while maintaining high-speed internet access.

    Conclusion

    [content-egg-block template=offers_list_groups]

    The MikroTik RB4011 Ethernet 10-Port Gigabit Router (RB4011iGS+RM) is a top-tier networking solution that combines power, efficiency, and advanced features. This router delivers exceptional performance for home use. It is equally effective for small businesses and large enterprises. It ensures that your network can handle the demands of modern technology. The RB4011 has a robust build quality. Its versatile features make it a reliable choice. It is ideal for anyone looking to upgrade their network infrastructure.

    Product Details:

    • Item model number: RB4011IGS+RM
    • ASIN: B07HBW2NTR
    • Date First Available: September 14, 2018
    • Manufacturer: MikroTik
    • Is Discontinued By Manufacturer: No
  • How to Manage Bandwidth on a MikroTik Router

    How to Manage Bandwidth on a MikroTik Router

    To effectively manage bandwidth on a MikroTik Router, it is crucial to maintain a fast, stable, and fair network. This is especially important in environments where multiple users or devices share a single internet connection. MikroTik routers offer robust tools in RouterOS to monitor, limit, and shape traffic using queues.

    Step: Manage Bandwidth MikroTik

    Whether you’re an ISP, office administrator, or home user, this guide will assist you effectively. It will help you manage the bandwidth on a MikroTik Router efficiently. It will guide you through the allocation process step by step.

    Step 1: Identify Interface IP Ranges

    Before applying bandwidth limits:

    Step 2: Use Simple Queues

    (Basic Bandwidth Limiting). Example: Limit a single device (IP: 192.168.88.10) to 5 Mbps download and 2 Mbps upload.

    /queue simple add name="Limit_User1" target=192.168.88.10/32 \
     max-limit=5M/2M comment="Limit for User1"
    

    Tip: Use Winbox to add Simple Queues via Queues > Simple Queues.

    Step 3: Use Per Connection Queuing

    We Use PCQ For Fair Bandwidth Sharing. To share bandwidth fairly among multiple users, set up PCQ (Per Connection Queueing).

    Step 3.1: Create PCQ Queue Types

    /queue type
    add name=pcq-download kind=pcq pcq-classifier=dst-address pcq-rate=5M pcq-total-limit=2000000
    add name=pcq-upload kind=pcq pcq-classifier=src-address pcq-rate=2M pcq-total-limit=2000000
    

    Step 3.2: Create a Simple Queue Using PCQ

    /queue simple add name="LAN Bandwidth Limit" target=192.168.88.0/24 \
     queue=pcq-upload/pcq-download max-limit=10M/10M
    

    This evenly distributes the 10 Mbps connection among all users in the subnet.

    Step 4: Use Queue Trees

    We use the Queue Trees for Advanced Bandwidth Management (Optional). Queue Trees are better for upload/download separation and multiple bandwidth classes on your MikroTik Router.

    Step 4.1: Mark Traffic in Mangle

    /ip firewall mangle
    add chain=forward src-address=192.168.88.0/24 action=mark-packet new-packet-mark=upload passthrough=yes
    add chain=forward dst-address=192.168.88.0/24 action=mark-packet new-packet-mark=download passthrough=yes
    

    Step 4.2: Create Queue Tree Rules

    /queue tree
    add name="Upload Limit" parent=ether1 packet-mark=upload queue=pcq-upload max-limit=10M
    add name="Download Limit" parent=ether1 packet-mark=download queue=pcq-download max-limit=10M
    

    Replace ether1 with the correct interface (LAN or WAN, depending on direction).

    Step 5: Monitor Bandwidth Usage

    • Use Winbox > Queues to see real-time usage.
    • Use Tools > Torch to inspect live traffic per IP, port, and protocol.

    Step 6: Prioritize Critical Services

    This step is (Optional). You can use priority settings in queues to ensure services like VoIP or Zoom get better bandwidth quality.

    Example:

    /queue simple add name="VoIP Priority" target=192.168.88.50/32 \
     max-limit=1M/1M priority=1
    

    Managing bandwidth on a MikroTik router is both flexible and powerful. You might want a simple per-user limit. Alternatively, you could seek advanced control using queue trees and packet marking. MikroTik gives you all the tools you need to effectively manage your bandwidth.

    Start with simple queues if you’re new, and move into PCQ or queue trees as your network grows in complexity. With proper bandwidth management, you’ll enjoy a smoother and more reliable internet experience for everyone on your network.

    Mikrotik Ethernet Router Review

    The Mikrotik CCR2004-16G-2S+PC is a high-performance Ethernet router designed for enterprise-level networking. Mikrotik manufactures this product. They are a well-known name in the networking industry. This product is categorized as an Ethernet router. It is intended for use in medium to large networks that require robust and reliable connectivity.

    Appearance and Design

    The CCR2004-16G-2S+PC features a sleek, modern design that is both functional and aesthetically pleasing. The router is housed in a sturdy metal chassis, ensuring durability while providing efficient heat dissipation. The front panel showcases 16 Gigabit Ethernet ports and 2 SFP+ cages, designed for easy access and organization.

    The LED indicators are well-placed, allowing for quick status checks of the device’s operation. Its rack-mountable design makes it ideal for integration into server racks or network cabinets, further enhancing its professional appearance.

    Key Features and Specifications

    • 16x Gigabit Ethernet Ports: Provides ample connectivity options for various devices.
    • 2x 10G SFP+ Cages: Allows for high-speed fiber connections, enhancing network performance.
    • Powerful CPU: Equipped with a 4-core processor for efficient multitasking and data handling.
    • RouterOS Support: Utilizes Mikrotik’s RouterOS, offering advanced routing features and configurations.
    • Advanced Cooling System: Designed for optimal thermal management to ensure reliability under heavy loads.

    User Experience

    In various scenarios, the Mikrotik CCR2004-16G-2S+PC has proven its versatility and power. Setting up the router was straightforward, thanks to the intuitive RouterOS interface. Connecting multiple devices was seamless, with no noticeable lag or connectivity issues. In a typical office environment, the router managed to handle heavy data loads. It efficiently supported video conferencing. Large file transfers and streaming services were handled without breaking a sweat.

    When tested in a home setting with multiple smart devices, the router maintained a strong and stable connection. It showcased its capability to support high bandwidth usage. The SFP+ cages were particularly beneficial for users who want to integrate fiber optics into their networks. This integration allows for future-proofing as network demands grow.

    Pros and Cons

    Pros

    • High performance with 16 Gigabit ports and 2 SFP+ cages.
    • Durable and professional design suitable for various environments.
    • RouterOS provides extensive features for advanced users.
    • Efficient cooling system, ensuring reliability during operation.

    Cons

    • Initial setup may be daunting for users unfamiliar with RouterOS.
    • Higher price point compared to basic home routers.
    • Limited documentation may require additional research for advanced configurations.

    Conclusion

    [content-egg-block template=offers_list]

    The Mikrotik CCR2004-16G-2S+PC Ethernet router is a powerful choice for businesses. It is also a reliable option for tech-savvy individuals needing robust networking solutions. Its performance is impressive. The extensive features and professional design make it a solid investment for anyone looking to enhance their network.

    While it may come with a learning curve for beginners, it provides excellent value for the price. The benefits far outweigh the challenges. Recommended for those seeking a high-capacity router that can grow with their networking needs.

  • How to Control Traffic with MikroTik Firewall

    How to Control Traffic with MikroTik Firewall

    MikroTik routers running RouterOS provide powerful firewall features to control network traffic. You’re securing your LAN, limiting external access, or managing bandwidth usage. It is essential to know how to allow traffic. It is also important to learn how to drop or reject traffic based on IP address, port, and protocol.

    Steps: Controlling Traffic MikroTik Firewall

    This step-by-step guide will walk you through the basic rules to control traffic on your MikroTik device. These are the most commonly used rules for effective traffic control, and you’ll understand how to control MikroTik firewall efficiently.

    Step 1: Winbox Access MikroTik

    • You can use Winbox, WebFig, or the terminal (CLI) to add rules to your MikroTik firewall control flow.
    • All the steps below can be entered directly into the terminal or configured through the GUI.

    Step 2: Allow Traffic from Specific IP

    Example: Allow traffic from 192.168.1.100 to any service. This step is crucial to utilize control over the MikroTik firewall effectively.

    /ip firewall filter add chain=input src-address=192.168.1.100 action=accept comment="Allow IP 192.168.1.100"
    

    Step 3: Allow Traffic Specific Port

    Example: Allow TCP traffic on port 80 (HTTP). Adding such rules helps in controlling the MikroTik firewall.

    /ip firewall filter add chain=input protocol=tcp dst-port=80 action=accept comment="Allow HTTP traffic"
    

    For UDP: Control effort in setting up your MikroTik firewall includes configuring rules like these.

    /ip firewall filter add chain=input protocol=udp dst-port=53 action=accept comment="Allow DNS traffic"
    

    🚫 Step 4: Drop Traffic from Specific IP

    Example: Drop traffic from 203.0.113.45. It’s a key part of controlling MikroTik firewall settings.

    /ip firewall filter add chain=input src-address=203.0.113.45 action=drop comment="Drop traffic from malicious IP"
    

    🚫 Step 5: Drop Traffic to a Specific Port

    Example: Drop all traffic trying to access port 23 (Telnet). That is a precise method to control traffic on MikroTik firewall.

    /ip firewall filter add chain=input protocol=tcp dst-port=23 action=drop comment="Drop Telnet"
    

    Step 6: Reject Traffic with Feedback

    Example: Reject access to port 21 (FTP) with an ICMP message. Efficient implementation is key to controlling MikroTik firewall operation.

    /ip firewall filter add chain=input protocol=tcp dst-port=21 action=reject reject-with=icmp-port-unreachable comment="Reject FTP access"
    

    Reject vs Drop:

    • Reject sends a response back (e.g., port unreachable), useful for debugging or soft-blocking.
    • Drop silently discards the packet, good for stealth blocking.

    ⚠️ Step 7: Place Rules in Correct Order

    • MikroTik processes firewall rules top to bottom. Gaining control over the MikroTik firewall relies on understanding this processing sequence.
    • Place “accept” rules before “drop” or “reject” for the same traffic type.
    • Use /ip firewall filter print to see rule order and priorities.

    🧹 Step 8: Clean Up Unused or Test Rules

    This step can (Optional)

    /ip firewall filter remove [find comment="Test Rule"]
    

    With MikroTik’s firewall filter rules, you have granular control over your network traffic. You need to understand how to work with IP addresses. It’s essential to know how to work with ports and protocols. This knowledge is fundamental.

    Always test your rules in a controlled environment. Regularly review your firewall policies to keep your network secure and efficient. Moreover, controlling the MikroTik firewall effectively ensures continued network security and efficiency.

    MikroTik’s RouterOS is a powerful operating system for network routers, renowned for its robust feature set and granular control. Two of its most critical components for managing network security and traffic are the Firewall and the Proxy server. While both are used to control data flow, they operate at different network layers. They also serve distinct primary purposes.

    The firewall acts as a gatekeeper and traffic cop, enforcing security policies based on IP addresses, ports, and protocols. In contrast, the proxy server acts as an intermediary. It also functions as a caching agent, primarily for web (HTTP/HTTPS) traffic. It offers control over content and potentially improves performance. Understanding their individual functions is key to building a secure and efficient network.

    The Function of Firewall in MikroTik

    The firewall is your network’s primary line of defense. It operates at the network layer of the OSI model. It also operates at the transport layer. It inspects packets and makes decisions based on rules (filters).

    Its core functions include:

    1. Packet Filtering: This is the fundamental job of a firewall. It examines the header of each packet entering or leaving the network. Based on predefined rules, it accepts, drops, or rejects the packet.
      • Criteria: Rules are built using criteria like source/destination IP address, port number (e.g., port 80 for HTTP, port 22 for SSH), and protocol (e.g., TCP, UDP, ICMP).
      • Example: A rule can block all incoming SSH connection attempts from the internet. It would drop all packets with dst-port=22 coming from the WAN interface.
    2. Network Address Translation (NAT): MikroTik’s firewall handles NAT, which is essential for most networks.
      • Src-NAT (Masquerade): This allows multiple devices on your local network (with private IPs like 192.168.88.xxx) to share the router’s single public IP address to access the internet. It “masquerades” all local traffic as coming from the router itself.
      • Dst-NAT (Port Forwarding): This feature lets you redirect a specific external port. It uses the router’s public IP to route to a port on a specific internal server. For example, forwarding external port 80 to a local web server’s IP on port 80.
    3. Stateful Inspection: This is a crucial advanced feature. A stateful firewall doesn’t just look at individual packets. It tracks the state of active connections. This includes identifying which internal device started a request to a website. It dynamically allows returning traffic for that established connection. This makes rule management more secure. It is simpler than a simplistic “stateless” firewall.
    4. Traffic Flow and Classification (Mangle): The firewall’s “mangle” feature marks packets for special processing. This is not for security but for advanced traffic management, such as:
      • Quality of Service (QoS): Marking certain types of traffic (e.g., VoIP, gaming) for priority treatment.
      • Policy-Based Routing: Forcing specific traffic (e.g., from a particular IP) to use a specific gateway or route.

    The Function of Proxy in MikroTik

    The proxy in MikroTik is primarily a web proxy (caching proxy). It operates at the application layer (Layer 7) for HTTP and HTTPS traffic. It acts as an intermediary for requests from clients seeking resources from servers.

    Its core functions include:

    1. Caching: This is the primary reason to use the proxy. It stores (caches) frequently accessed web pages, images, and files locally on the router’s storage.
      • Benefit: When a second user requests the same content, the proxy serves it from the local cache. It doesn’t fetch from the internet again. This reduces bandwidth usage and speeds up web browsing for users.
    2. Content Filtering and Access Control: Because it understands HTTP, the proxy can make filtering decisions based on website content.
      • URL Filtering: You can create blacklists (block specific websites) or whitelists (only allow specific websites).
      • Domain Filtering: Block access to entire domains.
      • Keyword Filtering: Block pages that contain specific words in their URL.
    3. Bandwidth Management: You can apply speed limits for HTTP traffic through the proxy. This allows for basic per-user or global HTTP bandwidth control.
    4. Authentication: The proxy can require users to authenticate. They may need to log in with a username and password. Only then are they allowed to browse the web. This is useful for public hotspots or corporate networks to identify users.

    Important Note on HTTPS: Modern web traffic is largely encrypted (HTTPS). A basic web proxy cannot see or cache the content of HTTPS connections. It can do so only if it acts as a man-in-the-middle. This requires installing a custom certificate on every client device. This is complex to set up. It has security and privacy implications. Many administrators use the proxy primarily for HTTP. They use the firewall for general access control.

    Conclusion

    In summary, the Firewall and Proxy in MikroTik serve complementary but distinct roles in network management. The Firewall is your indispensable, high-performance security guard, controlling all traffic based on IPs, ports, and connection states. It is essential for every MikroTik setup to protect the network from external threats and manage NAT.

    The Proxy, on the other hand, is a specialized application-layer tool focused on web traffic. Its main value lies in caching to save bandwidth and accelerate browsing, and in performing content-based filtering. For most small office or home setups, a well-configured firewall is sufficient. The proxy becomes more relevant in environments with many users. In these environments, web caching provides a tangible benefit. Detailed HTTP-specific logging and filtering are also required. Ultimately, using them in tandem provides a comprehensive solution for both robust security and efficient web traffic management.

  • How to protect against brute-force attacks on a Mikrotik router

    How to protect against brute-force attacks on a Mikrotik router

    MikroTik routers are widely used in home, business, and ISP networks due to their flexibility and powerful RouterOS features. However, like any network device exposed to the internet, they can become targets of DoS (Denial of Service) attacks. They can also be vulnerable to brute-force login attempts. It is crucial to protect against brute-force attacks to safeguard your network security.

    Tips: Protect Against DoS on MikroTik

    These attacks can overwhelm your network or compromise your router’s security by repeatedly guessing credentials. Fortunately, MikroTik offers several tools and techniques to help detect and mitigate these threats. By applying security measures, you can protect your MikroTik against brute-force attacks and safeguard your network.

    1. Limit Access to Winbox, Web, and SSH

    • Restrict management access to trusted IP addresses only: /ip service set winbox address=YOUR-IP-ADDRESS/32 /ip service set www address=YOUR-IP-ADDRESS/32 /ip service set ssh address=YOUR-IP-ADDRESS/32

    2. Enable Connection Limits

    • Drop suspicious connections with too many requests: /ip firewall filter add chain=input protocol=tcp connection-limit=30,32 action=drop

    3. Drop Invalid Packets

    /ip firewall filter add chain=input connection-state=invalid action=drop
    

    4. Block Port Scanning

    /ip firewall filter add chain=input protocol=tcp psd=21,3s,3,1 action=add-src-to-address-list address-list=port_scanners address-list-timeout=1d
    /ip firewall filter add chain=input src-address-list=port_scanners action=drop
    

    5. Dynamic Address Lists

    • Automatically block IPs behaving suspiciously.

    6. SYN Flood Protection

    /ip firewall filter add chain=input protocol=tcp tcp-flags=syn connection-limit=100,32 action=drop
    

    7. Rate-Limit ICMP Requests

    /ip firewall filter add chain=input protocol=icmp limit=5,10 action=accept
    /ip firewall filter add chain=input protocol=icmp action=drop
    

    8. Careful Use of FastTrack

    • Temporarily disable FastTrack during attacks to enforce firewall rules.

    9. Keep RouterOS Updated

    • Stay current with MikroTik’s firmware and security patches.

    10. Monitor Logs and Network Behavior

    • Use MikroTik’s tools like Torch or Log Viewer to monitor potential attack attempts.

    Tips: Protect Against Brute-Force on MikroTik

    In addition to DoS, many attackers use brute-force methods to gain access via SSH, Telnet, FTP, or Winbox. Implementing strategies specific to brute-force protection is essential to secure your MikroTik network.

    • Turn off any services you don’t use to reduce attack surfaces: /ip service disable telnet /ip service disable ftp /ip service disable www /ip service disable api
    • Create a strong password and disable or rename the default “admin” account. This is crucial to protect against brute-force attacks on your MikroTik: /user add name=secureadmin group=full password=STRONGPASS /user remove admin
    • Dynamically detect and block IPs attempting multiple failed logins: /system logging add topics=login action=memory

    Then create firewall rules like:

    /ip firewall filter add chain=input protocol=tcp dst-port=22,8291,21,23 \
      src-address-list=brute_blacklist action=drop
    
    /ip firewall filter add chain=input protocol=tcp dst-port=22,8291,21,23 \
      src-address-list=brute_stage2 action=add-src-to-address-list \
      address-list=brute_blacklist address-list-timeout=1d
    
    /ip firewall filter add chain=input protocol=tcp dst-port=22,8291,21,23 \
      src-address-list=brute_stage1 action=add-src-to-address-list \
      address-list=brute_stage2 address-list-timeout=1h
    
    /ip firewall filter add chain=input protocol=tcp dst-port=22,8291,21,23 \
      action=add-src-to-address-list address-list=brute_stage1 address-list-timeout=15m
    

    This logic tracks IPs trying multiple logins in short intervals and gradually escalates the block duration.

    • Hide or close ports completely. Open them only using port knocking. Access your router exclusively via a secure VPN.

    Securing your MikroTik router from DoS and brute-force attacks is crucial for maintaining a stable and secure network. By properly configuring firewall rules, you can greatly reduce the chances of an attack succeeding.

    Protect against brute-force attacks on MikroTik devices by restricting management access, too. Use dynamic protections like address lists. Regular monitoring, firmware updates, and enforcing strong login practices complete a solid security posture. MikroTik gives you the tools—you just need to apply them smartly.

    In today’s interconnected world, cybersecurity threats are everywhere — especially for networks, websites, and systems exposed to the internet. Two common types of attacks that organizations and individuals face are DoS (Denial of Service) attacks and Brute-Force attacks. These attacks serve different purposes. They also use different methods. However, both can seriously impact your network, devices, or services if left unprotected. Understanding these attack types is crucial for defending your systems effectively.

    1. What is DoS (Denial of Service) Attack?

    🛑 Definition:

    A DoS attack occurs when an attacker attempts to overwhelm a network, server, or device. This could be a router or website. The attacker floods it with a massive amount of traffic or requests. This action causes the system to slow down or crash.

    📌 Purpose:

    • To disrupt services and make them unavailable to legitimate users.
    • Often used to take down websites, online services, or networked devices.

    🔧 How It Works:

    • The attacker sends a large volume of traffic (e.g., pings, HTTP requests) to the target.
    • The system cannot handle the overload, causing performance issues or complete failure.

    🔥 Common Types of DoS:

    • SYN Flood
    • UDP Flood
    • ICMP (Ping) Flood
    • HTTP Flood

    ⚠️ Impact:

    • Website downtime
    • Network slowdowns
    • Service interruption
    • Business or financial losses

    2. What is a Brute-Force Attack?

    🔓 Definition:

    A Brute-Force attack occurs when an attacker attempts to guess a username and password. They try every possible combination. This continues until they obtain the correct one.

    📌 Purpose:

    • To gain unauthorized access to accounts, devices, or systems.
    • Common targets: admin panels, SSH servers, Wi-Fi networks, email accounts.

    🔧 How It Works:

    • The attacker uses a script or automated tool to try thousands (or millions) of password combinations.
    • Weak or common passwords are cracked quickly.
    • Once access is gained, the attacker can steal data, install malware, or take over the system.

    🔐 Types of Brute-Force Attacks:

    • Simple brute-force: Trying all combinations (e.g., 123456, password).
    • Dictionary attack: Tries known passwords from a list.
    • Credential stuffing: Uses leaked usernames/passwords from previous breaches.

    ⚠️ Impact:

    • Unauthorized access to sensitive data
    • Account hijacking
    • System compromise
    • Data theft or manipulation

    Key Differences: DoS vs Brute-Force

    FeatureDoS AttackBrute-Force Attack
    GoalDisrupt service / crash systemGain unauthorized access
    MethodFlooding with trafficTrying many passwords/logins
    ImpactMakes services unavailableCompromises accounts or devices
    DetectionHigh CPU usage, slowdowns, system failureFailed login attempts, locked accounts
    Prevention ToolsFirewalls, traffic filters, rate limitingStrong passwords, login attempt limits, 2FA

    Conclusion

    Both DoS and Brute-Force attacks are serious cyber threats, but they serve very different purposes. A DoS attack aims to disrupt or disable your service. A Brute-Force attack tries to break into your system by guessing credentials. Understanding these attacks helps you better secure your network.

    You can use appropriate defense measures, such as firewalls, rate limiting, account lockouts, and multi-factor authentication. The key to protection is preparation. By identifying vulnerabilities early, you can apply smart security practices. This way, you can prevent both types of attacks from compromising your system.

  • How to protect against DoS on a Mikrotik router

    How to protect against DoS on a Mikrotik router

    MikroTik routers are widely used in home, business, and ISP networks due to their flexibility and powerful RouterOS features. However, like any network device exposed to the internet, they can become targets of DoS (Denial of Service) attacks.

    Protect Against DoS on MikroTik Router

    These attacks can slow down or completely knock out your network by overwhelming the router with traffic. Fortunately, MikroTik offers several tools and techniques to help detect and mitigate these threats. Here’s how you can protect your MikroTik router from DoS attacks effectively.

    1. Limit Access to Winbox, Web, and SSH

    • Restrict management access to known IPs only: /ip service set winbox address=YOUR-IP-ADDRESS/32 /ip service set www address=YOUR-IP-ADDRESS/32 /ip service set ssh address=YOUR-IP-ADDRESS/32
    • Alternatively, block public access entirely and manage the router from within a VPN.

    2. Enable Connection Limits

    • Limit the number of connections per IP to avoid abusive behavior: /ip firewall filter add chain=input protocol=tcp connection-limit=30,32 action=drop

    3. Use Firewall Rules Drop Invalid Traffic

    • Filter out malformed or suspicious packets: /ip firewall filter add chain=input connection-state=invalid action=drop

    4. Block Port Scanning and Attack Ports

    • Add rules to detect and block port scanners: /ip firewall filter add chain=input protocol=tcp psd=21,3s,3,1 action=add-src-to-address-list address-list=port_scanners address-list-timeout=1d /ip firewall filter add chain=input src-address-list=port_scanners action=drop

    5. Use Address Lists and Dynamic Blacklist

    • Create dynamic address lists that block IPs based on behavior (e.g., too many connections, invalid login attempts).
    • These lists automatically expire, so they’re less likely to block legitimate users permanently.

    6. Enable SYN Flood Protection

    • Drop excessive TCP SYN packets to prevent SYN flood: /ip firewall filter add chain=input protocol=tcp tcp-flags=syn connection-limit=100,32 action=drop

    7. Rate-Limit ICMP (Ping) Requests

    • Prevent ping floods: /ip firewall filter add chain=input protocol=icmp limit=5,10 action=accept /ip firewall filter add chain=input protocol=icmp action=drop

    8. Use FastTrack Carefully

    • While FastTrack improves performance, it can bypass firewall inspection. Ensure it’s configured correctly or disable it during attacks.

    9. Regularly Update RouterOS

    • Keep your MikroTik firmware and RouterOS updated to patch vulnerabilities.

    10. Monitor Logs and Traffic

    • Use tools like Torch, Traffic Flow, or external monitoring solutions to watch for unusual spikes or patterns.

    Protecting your MikroTik router from DoS attacks is a critical step in ensuring network stability and uptime. By leveraging the powerful firewall features of RouterOS, you can effectively mitigate most common DoS threats. Limiting access and monitoring traffic are crucial strategies, too. Security isn’t a one-time setup—keep reviewing and adjusting your rules as your network evolves. With these tips, you’ll be much better equipped to defend your infrastructure against disruptive attacks.

    A DoS (Denial of Service) attack is a type of cyberattack. The attacker floods a device—like your MikroTik router—with excessive traffic or malicious data. This action overwhelms the device, causing it to slow down. It may malfunction or crash completely. MikroTik routers, while powerful and widely used, can become prime targets for such attacks if not properly secured.

    What Happens if have DoS Attack

    Understanding what happens during a DoS attack is essential to recognizing the signs early and defending your network effectively.

    • The router receives large volumes of unwanted traffic, using up its processing power and bandwidth.
    • This causes legitimate users on your network to experience sluggish internet, timeouts, or complete disconnection.

    🚫 Normal traffic gets drowned in the flood of attack packets.

    • DoS attacks overwhelm the router’s CPU and memory, forcing it to process thousands of useless packets.
    • In MikroTik’s Winbox or WebFig, you might see 100% CPU usage. This can occur even when little or no legitimate traffic is present.

    💡 High CPU load is one of the most common symptoms of a DoS attack.

    • If the attack is severe, the router may crash or reboot frequently, especially if system resources are exhausted.
    • Some MikroTik routers can even freeze completely, requiring a manual power cycle to recover.

    🛑 This leads to major service interruptions and loss of availability.

    • You may notice unusual patterns in your MikroTik logs:
      • Sudden spikes in ICMP (ping) requests
      • SYN floods (incomplete TCP handshakes)
      • UDP floods to open or closed ports
    • These are tell-tale signs of a DoS attempt.

    📘 Checking logs helps verify that the traffic is malicious, not just heavy usage.

    • MikroTik devices with outdated firmware can be more vulnerable.
    • Some attackers may combine DoS with exploitation attempts to inject malware or gain access.

    🔐 Always keep RouterOS updated to avoid known vulnerabilities being used in attacks.

    • DNS resolution may fail.
    • Users may not be able to access external websites.
    • VOIP, video conferencing, and online gaming are severely affected.

    🌐 This is usually how most users first notice something is wrong.

    If your MikroTik router is under a DoS attack, your entire network can become slow, unstable, or even unusable. The router’s CPU and memory are overwhelmed, leading to high latency, loss of connectivity, and possible crashes. Worse yet, unpatched routers can become compromised during or after such attacks.

    To defend against this, it’s critical to:

    • Keep RouterOS updated
    • Set up firewall rules to block or limit traffic
    • Enable connection tracking and use traffic filters
    • Consider using upstream protections (e.g., from your ISP or a service like Cloudflare for servers)

    Being proactive is the key. Understanding the impact of a DoS attack helps you recognize the warning signs early. You can then implement strong defenses to protect your network infrastructure.

  • How to add a remote IP Address to the Mikrotik Router step by step

    How to add a remote IP Address to the Mikrotik Router step by step

    🌐 In MikroTik RouterOS, adding a remote IP address typically means setting up a static route. It can also involve establishing a remote network or peer IP to communicate with external devices or networks. This is commonly used for:

    Step: Add Remote IP Address to MikroTik

    • Remote access via VPN
    • Static routing to another network
    • Whitelisting trusted IPs for services like SSH, Winbox, or HTTPS

    1. Add Static Route to a Remote IP

    This guide walks you through different methods. You can add a remote IP address on your MikroTik router using Winbox and CLI.

    [content-egg-block template=buttons_row]

    Using Winbox (GUI)

    1. Open Winbox and log in to your router.
    2. Go to IP → Routes.
    3. Click the “+” to add a new route.
    4. In the Dst. Address, enter the remote network or IP (e.g., 192.168.100.0/24 or 203.0.113.10/32 for a single IP).
    5. In the Gateway field, enter the next hop IP (e.g., the IP of the ISP gateway or VPN tunnel).
    6. (Optional) Set distance if you have multiple routes.
    7. Click OK.

    Using CLI

    /ip route add dst-address=192.168.100.0/24 gateway=192.168.88.1
    

    Replace dst-address with the remote network or IP, and gateway with your actual next hop.

    2: Add a Remote IP to Address List (ACL)

    This is useful when you want to allow or block access from a specific IP using firewall rules.

    Using Winbox

    1. Go to IP → Firewall → Address Lists.
    2. Click “+” to add a new entry.
    3. Enter a name (e.g., allowed-remote).
    4. In the Address field, type the remote IP (e.g., 203.0.113.5).
    5. (Optional) Add a comment.
    6. Click OK.

    Using CLI

    /ip firewall address-list add list=allowed-remote address=203.0.113.5 comment="Remote admin"
    

    You can use this list in firewall filter rules to allow/deny access to services.

    3: Allow Remote IP Access (SSH, Winbox)

    To allow only certain remote IPs to access specific services:

    Using Winbox

    1. Go to IP → Services.
    2. Click on the service (e.g., ssh, www-ssl, winbox).
    3. In the Available From field, enter the trusted remote IP or subnet (e.g., 203.0.113.5 or 203.0.113.0/24).
    4. Click OK.

    Using CLI

    /ip service set ssh address=203.0.113.5/32
    

    Repeat for other services as needed.

    Final Thoughts

    Adding a remote IP address to your MikroTik router is essential for managing secure and efficient network operations. It is important for routing, access control, and firewall whitelisting. Using either Winbox or the CLI, you can define exactly how your router communicates with external devices or networks.

    🔗 Need hardware for more advanced MikroTik setups?
    Visit our Amazon affiliate store for recommended MikroTik routers and accessories. Supporting us through your purchases helps keep these tutorials coming, at no additional cost to you!

    The TP-Link TL-SG2428P is a robust Gigabit smart managed PoE switch. It is designed for businesses and organizations that require reliable and efficient network management. TP-Link manufactures this product. They are a leader in networking solutions. This switch is ideal for deploying Power over Ethernet (PoE) devices.

    These include IP cameras, VoIP phones, and wireless access points. Its comprehensive feature set includes 24 PoE+ ports. The integration of Omada SDN ensures it delivers both performance and flexibility in modern networking environments.

    Appearance and Build Quality

    The TP-Link TL-SG2428P sports a sleek, professional design that is typical of enterprise-grade networking hardware. The switch is housed in a durable metal chassis that ensures longevity and reliability. It features a practical layout with clearly labeled ports and LED indicators for power, link status, and PoE activity.

    The front panel is designed for easy access to all ports. The rear has ventilation slots to ensure adequate heat dissipation. Overall, the aesthetic is functional yet modern, making it suitable for placement in server rooms or network closets.

    Key Features and Specifications

    • 24 PoE+ Ports: 10/100/1000 Mbps RJ45 ports provide up to 30W per port. The total PoE power budget is 250W.
    • 4 SFP Slots: For high-speed fiber connections, enhancing network performance.
    • Omada SDN Integration: Seamlessly integrates with TP-Link’s Omada SDN platform for centralized management.
    • Remote Cloud Access: Manage your network remotely through the Omada app.
    • Advanced Security Features: Includes 802.1Q VLAN, IP-MAC-Port binding, ACL, and more.
    • Advanced Software Capabilities: Traffic prioritization with L2/L3/L4 QoS, IGMP Snooping, and Link Aggregation.
    • 5-Year Warranty: Backed by TP-Link’s industry-leading warranty and technical support.

    Experience and Use Cases

    During my time with the TP-Link TL-SG2428P, I was impressed with its flexibility and ease of use. The installation process was straightforward, thanks to the clearly labeled ports and intuitive management interface. I deployed this switch in a small office setting, powering several IP cameras and VoIP phones without any issues. The PoE+ functionality provided seamless connectivity, eliminating the need for additional power sources for these devices.

    The Omada SDN integration truly stood out during my testing. Managing the network through the Omada app was a breeze. It allowed me to monitor traffic, configure settings, and receive alerts. I could do all of this from my smartphone. Additionally, the advanced security features gave me peace of mind, knowing that my network was well-protected against potential threats.

    Pros and Cons

    Pros:

    • Robust PoE capabilities with 24 ports and a substantial power budget.
    • Excellent integration with the Omada SDN platform, enhancing network management.
    • Comprehensive security features protect against unauthorized access and attacks.
    • Remote management via cloud access is convenient and user-friendly.
    • Durable construction ensures reliability over time.
    • 5-year warranty offers confidence in product longevity.

    Cons:

    • The initial setup may be complex for users unfamiliar with managed switches.
    • Limited documentation for advanced features could leave some users wanting more guidance.
    • Performance can be affected if all PoE ports are fully utilized simultaneously.

    Conclusion

    [content-egg-block template=buttons_row]

    TP-Link TL-SG2428P is an exceptional choice. It is ideal for those seeking a smart managed PoE switch. This switch balances power, performance, and advanced features. It integrates seamlessly with the Omada SDN platform. The switch’s strong security measures make it a valuable asset for any business network. New users may face a bit of a learning curve.

    However, the benefits it offers far outweigh the initial challenges. Overall, this switch provides excellent value and reliability, making it a highly recommended solution for modern network infrastructures.

  • How to remote access to Mikrotik Router via SSH and HTTPS

    How to remote access to Mikrotik Router via SSH and HTTPS

    🌍 Enable secure remote access via SSH and HTTPS on your MikroTik router. Next, you should learn how to connect to it. Begin by connecting from a remote location. Start by connecting from a remote location. The next step is to understand the connection process. Remote access lets you manage your router from anywhere. However, you should always use secure channels to prevent unauthorized access.

    🔐 Set: Remote Access MikroTik via SSH

    In this guide, we’ll show you how to access your MikroTik router remotely using SSH (command-line) and HTTPS (web-based GUI). We assume you’ve already completed the steps to enable both services. Additionally, you should have secured your router.

    📌 Prerequisites

    • SSH and HTTPS services already enabled and properly configured on the router
    • Public IP address or Dynamic DNS (DDNS) pointing to the router
    • Appropriate port forwarding (if behind NAT/firewall)
    • Access to the router’s WAN IP or domain name

    💻 Method 1: Remote Access via SSH

    🛠️ Requirements: (Command-Line Interface)

    • A terminal application like:
      • macOS/Linux: Terminal
      • Windows: PowerShell, Command Prompt, or PuTTY
    1. Open your terminal or SSH client (e.g., PuTTY).
    2. Run the following command: ssh admin@<your-public-ip> -p <ssh-port>
      • Replace admin with your MikroTik username
      • Replace <your-public-ip> with the router’s public IP or DDNS address (e.g., router.example.com)
      • Replace <ssh-port> with the SSH port (e.g., 2222 if you changed it from the default 22)
      Example: ssh admin@203.0.113.10 -p 2222
    3. Accept the SSH key fingerprint if prompted (first-time connection).
    4. Enter your password when prompted.

    You should now be inside your MikroTik CLI remotely!

    🌐 Method 2: Remote via HTTPS (WebFig)

    🛠️ Requirements:

    • Modern web browser (Chrome, Firefox, Edge)
    • HTTPS enabled on the router (with self-signed or trusted certificate)
    1. Open your browser.
    2. Navigate to your router’s public IP or DDNS address with HTTPS and port: https://<your-public-ip>:<https-port>. Example: https://203.0.113.10:8443
    3. You may get a warning about the certificate being untrusted (if using a self-signed cert). Proceed anyway or add a security exception.
    4. Enter your MikroTik username and password.

    You will now be logged into WebFig, the web-based configuration interface.

    🔄 (Optional) Use MikroTik’s Dynamic DNS (DDNS) for Easier Remote Access

    If your public IP changes often, use MikroTik’s built-in DDNS:

    /ip cloud enable
    

    Your router will get an address like yourrouter.sn.mynetname.net which you can use instead of the IP address.

    Final Thoughts

    Secure remote access to your MikroTik router via SSH and HTTPS makes remote network management efficient and safe. Just remember to harden your security settings, use non-default ports, and restrict access by IP when possible.

    🔗 Need MikroTik hardware for secure networking?
    Check out our recommended MikroTik routers and accessories on our Amazon affiliate store. You’ll get high-performance devices, and your support helps us continue creating helpful content, at no extra cost to you!

    The TP-Link Smart WiFi 6 Router (Archer AX10) is a cutting-edge router. It is designed by TP-Link, a reputable manufacturer. They are known for their innovative networking products. This router falls under the category of wireless routers. It is intended for home and small office use. This router caters to users with high-bandwidth needs such as streaming, gaming, and smart home connectivity.

    Appearance and Design

    The Archer AX10 features a sleek and modern design that blends well with contemporary home decor. The router is predominantly black with a matte finish, giving it a sophisticated look. It is compact and lightweight. This makes it easy to place on a shelf or desk. It does not take up too much space. The unique design element includes four adjustable antennas. These antennas enhance signal reception and transmission. This setup ensures optimal coverage throughout your home or office.

    Key Features and Specifications

    • OneMesh Compatible: Works seamlessly with TP-Link OneMesh WiFi extenders for extended coverage.
    • Wi-Fi 6 Technology: Utilizes advanced features like OFDMA and 1024-QAM for improved network efficiency.
    • Dual Band: Offers 300 Mbps on 2.4 GHz and 1201 Mbps on 5 GHz.
    • Multi-Device Connectivity: Supports OFDMA and MU-MIMO for simultaneous data communication to multiple devices.
    • Powerful Processor: Dual-Core 900MHz processor for smooth performance with minimal lag.
    • Beamforming Technology: Focuses the Wi-Fi signal directly to connected devices for better coverage.
    • Backward Compatibility: Supports all previous 802.11 standards.
    • Compatibility: Works with major internet service providers.

    User Experience

    During my time using the TP-Link Archer AX10, I was impressed with its performance across various scenarios. Streaming high-definition videos on platforms like Netflix and YouTube was seamless, with no buffering issues. Online gaming was also a delight; the router managed to handle multiple devices simultaneously without any noticeable lag or interruptions. The parental controls were easy to set up, allowing me to manage device access and screen time effectively.

    Setting up the router was straightforward, thanks to the user-friendly app and clear instructions. I appreciated the OneMesh feature. It allowed me to extend my Wi-Fi coverage by incorporating TP-Link extenders. This effectively eliminated dead zones in my home.

    Pros and Cons

    Pros:

    • Excellent speed and performance with Wi-Fi 6 technology.
    • Easy setup and management through the TP-Link app.
    • Strong signal coverage with Beamforming technology.
    • Ability to connect multiple devices without performance degradation.
    • Affordable price point for a Wi-Fi 6 router.

    [content-egg-block template=offers_logo_shipping_groups]

    Cons:

    • The design may not appeal to everyone, as some may prefer a more traditional look.
    • Limited advanced features compared to higher-end models.
    • Configuration options can be overwhelming for novice users.

    Conclusion

    The TP-Link Smart WiFi 6 Router (Archer AX10) is an excellent choice. It is ideal for those looking to upgrade their home or small office network. Its combination of advanced technology, ease of use, and reliable performance makes it a standout product in its price range. It may lack some of the more advanced features found in premium models. However, it offers tremendous value for anyone needing robust and efficient Wi-Fi coverage. I highly recommend this router for users looking to enhance their internet experience.

  • How to enable secure access via SSH and HTTPS on Mikrotik

    How to enable secure access via SSH and HTTPS on Mikrotik

    🔐 Securing remote access to your MikroTik router is essential to protect your network from unauthorized access and potential threats. While MikroTik offers various ways to manage your router (like Winbox and WebFig), you should enable SSH. Doing so will provide encrypted and secure channels for remote administration. Additionally, enable HTTPS for further protection. SSH is perfect for command-line access, while HTTPS encrypts web-based GUI management.

    Steps: Enable SSH and HTTPS on MikroTik

    This guide will walk you through the steps to enable SSH and HTTPS access on your MikroTik router. It explains how to use both Winbox and the CLI.

    🔍 Prerequisites

    • MikroTik RouterOS (preferably updated to latest version)
    • Admin access via Winbox or terminal
    • Basic networking knowledge

    🖥️ Enable SSH Access

    Option A: Using Winbox

    1. Open Winbox and log in to your router.
    2. Go to IP → Services.
    3. Find the SSH service in the list.
    4. Make sure it’s enabled (check the checkbox).
    5. (Optional but recommended) Change the default port from 22 to something higher (e.g., 2222) to reduce automated attack attempts.
    6. Apply IP address restrictions by setting Available From to trusted IPs only (e.g., 192.168.88.0/24 or your public IP).
    How to enable secure access via SSH and HTTPS on Mikrotik

    Click on SSH, it will pop up the tab to edit the port

    How to enable secure access via SSH and HTTPS on Mikrotik

    Option B: Using CLI

    /ip service enable ssh
    /ip service set ssh port=2222 address=192.168.88.0/24
    

    🌐 Enable HTTPS (Secure Web Access)

    Option A: Using Winbox

    1. Go to IP → Services.
    2. Find www-ssl (this is the HTTPS service).
    3. Make sure it’s enabled.
    4. (Optional) Change the port from 443 to another secure port (e.g., 8443).
    5. Restrict access using the Available From field.
    How to enable secure access via SSH and HTTPS on Mikrotik

    Click on WWW-SSL, it will pop up the tab and you can change to new port

    How to enable secure access via SSH and HTTPS on Mikrotik

    Note: If www-ssl is missing, your router may not have an SSL certificate installed. You can create a self-signed certificate:

    1. Go to System → Certificates.
    2. Click Add to generate a new certificate:
      • Name: myCert
      • Common Name: router.local or your domain/IP
    3. Sign the certificate.
    4. Set it as the SSL certificate under IP → Services → www-ssl.

    Option B: Using CLI

    /ip service enable www-ssl
    /ip service set www-ssl port=8443 address=192.168.88.0/24
    
    # Create and sign self-signed certificate if needed
    /certificate add name=myCert common-name=router.local key-usage=key-cert, tls-server
    /certificate sign myCert
    /ip service set www-ssl certificate=myCert
    

    🛡️ Best Practices

    • Disable unused services like Telnet or FTP: /ip service disable telnet /ip service disable ftp
    • Use strong passwords and consider using public key authentication for SSH.
    • Limit access to known/trusted IP addresses using the Available From field.
    • Regularly update RouterOS for security patches.

    Final Thoughts

    Enabling SSH and HTTPS access on your MikroTik router ensures secure and encrypted communication. This is especially important when managing devices remotely. With these protocols in place and unnecessary services disabled, your network’s control plane becomes significantly more secure. Learn more about how to remotely access Mikrotik Router via SSH and HTTPS to test after you have been enabled.

    🔗 Tip: If you’re upgrading your MikroTik router, consider secure remote access for multiple sites. Check out our recommended devices on our Amazon affiliate store. Your purchase supports our site at no extra cost to you!

    The TP-Link TL-SG2428P is a sophisticated managed PoE switch designed for small to medium-sized businesses and home networking enthusiasts. Manufactured by TP-Link, a well-known leader in networking equipment, this switch falls under the category of gigabit smart managed switches. It is tailored for users who want to enhance their network with Power over Ethernet (PoE) capabilities. This makes it ideal for connecting devices like IP cameras, access points, and VoIP phones.

    Appearance and Build Quality

    The TL-SG2428P features a sleek, modern design with a durable metal chassis that ensures longevity and stability. The switch is a standard 1U size, fitting perfectly into the majority of server racks. Its front panel showcases 28 Gigabit Ethernet ports. Twenty-four of them support PoE+, which allows for efficient power delivery alongside data transmission.

    The inclusion of 4 SFP slots at the rear provides versatility for high-speed connections and fiber optics. The overall aesthetic is professional, making it suitable for both office environments and home networking setups.

    Key Features and Specifications

    • PoE Configuration: 24× PoE+ (802.3at/af) ports, delivering up to 30W per port and a total PoE power budget of 250W.
    • Integrated Omada SDN: Seamless integration with the Omada Software Controller for centralized management.
    • Cloud Access: Remote management capabilities through the Omada app, enabling control from anywhere.
    • Advanced Security Features: Supports VLAN, ACL, DoS defense, DHCP Snooping, and 802.1X radius authentication.
    • Traffic Prioritization: L2/L3/L4 QoS, IGMP Snooping, Link Aggregation, and Flow Control for enhanced performance.
    • Warranty: Backed by a 5-year warranty and free technical support.

    [content-egg-block template=price_alert]

    Experience and Use Cases

    Setting up the TP-Link TL-SG2428P was straightforward, especially for users familiar with network switches. The integration with the Omada Software Controller made it easy to manage multiple devices from a single interface.

    In a home lab environment, this switch performed exceptionally well, providing stable connections without drops, even under heavy load. VLAN configuration was straightforward, allowing me to segment my network for better security and performance.

    In a small business scenario, this switch becomes invaluable. Using it alongside TP-Link EAP access points helped me eliminate the clutter caused by multiple PoE injectors. This created a cleaner and more organized network rack. The ability to prioritize traffic was particularly advantageous for VoIP communications, ensuring high-quality call quality.

    Pros and Cons

    Pros

    • Robust PoE support with a high power budget.
    • Seamless integration with the Omada SDN platform.
    • Advanced security features for network protection.
    • Reliable performance with no frequent connection drops.
    • Excellent build quality that ensures durability.
    • Comprehensive management options via cloud access.

    Cons

    • Initial setup may be complex for users unfamiliar with managed switches.
    • Higher cost compared to non-managed switches, which may not be justified for basic home use.
    • Some advanced features require proper knowledge to configure effectively.

    Conclusion

    Overall, the TP-Link TL-SG2428P is a powerful, feature-rich switch that excels in both small business and advanced home networking environments. It has robust PoE capabilities. The convenience of the Omada SDN integration makes it an excellent choice.

    It is perfect for users looking to build a reliable and efficient network. Some users may experience a learning curve. However, the benefits far outweigh the drawbacks. This switch is a worthy investment for those serious about their networking needs.

  • How to configure wireless on Mikrotik router

    How to configure wireless on Mikrotik router

    If you want to configure wireless on a MikroTik router, set up a wireless network on a MikroTik router. It allows users to connect wirelessly with robust performance. It provides security and management features. MikroTik’s RouterOS offers advanced wireless configuration tools that can be tailored for both home and enterprise environments.

    Step: Configure Wireless on MikroTik

    In this guide, you’ll learn how to set up a wireless access point (AP) on a MikroTik router. You will use both the Winbox GUI and the Command Line Interface (CLI).

    Prerequisites

    • MikroTik router with built-in wireless interface (e.g., hAP series)
    • Winbox installed or terminal access (SSH or WebFig)
    • Basic knowledge of Wi-Fi SSIDs, channels, and security

    Option 1: Configure Wireless via Winbox (GUI)

    1. Open Winbox and Connect

    • Connect to your MikroTik router using Winbox via MAC address or IP.
    How to configure wireless on Mikrotik router

    2. Enable the Wireless Interface

    • Go to Wireless from the left menu.
    • Double-click your wireless interface (e.g., wlan1).
    • Check “Enabled” at the top if it’s disabled.
    How to configure wireless on Mikrotik router

    3. Set Wireless Mode

    • In the interface settings, go to the Wireless tab.
    • Set Mode to ap bridge (for access point mode).
    • Choose the Band (e.g., 2GHz B/G/N or 5GHz A/N/AC depending on your device).
    • Set Frequency (auto or a fixed channel depending on environment).
    • Name your SSID (e.g., Mikrotik-WiFi).
    • Click Apply and OK.
    How to configure wireless on Mikrotik router

    4. Configure Wireless Security (WPA2)

    • Go to Wireless → Security Profiles.
    • Click the “+” to add a new profile.
    • Name it (e.g., home_wifi).
    • Set Authentication Type to WPA2 PSK.
    • Enter your Wi-Fi password in the WPA2 Pre-Shared Key field.
    • Click OK.
    How to configure wireless on Mikrotik router

    5. Assign the Security Profile

    • Go back to Wireless → Interfaces → wlan1 → Wireless tab.
    • Select your newly created security profile from the dropdown.
    • Click Apply and OK.
    How to configure wireless on Mikrotik router

    6. Bridge Wireless and LAN (if needed)

    • Go to Bridge → Add a new bridge if one does not exist.
    • Add both ether interfaces and wlan1 to the bridge under Bridge → Ports.
    How to configure wireless on Mikrotik router

    Now we have set up wireless, at (wlan1) we can rename later as here wlan1-Wifi

    How to configure wireless on Mikrotik router

    Option 2: Configure Wireless via CLI

    # Enable wireless interface
    /interface wireless enable wlan1
    
    # Set up wireless AP mode, SSID, and frequency
    /interface wireless set wlan1 mode=ap-bridge ssid="MyWiFi" frequency=2412 band=2ghz-b/g/n
    
    # Create security profile
    /interface wireless security-profiles add name=home_wifi authentication-types=wpa2-psk wpa2-pre-shared-key="YourPassword123"
    
    # Apply security profile to wlan1
    /interface wireless set wlan1 security-profile=home_wifi
    
    # Add wlan1 to bridge
    /interface bridge add name=bridge1
    /interface bridge port add interface=wlan1 bridge=bridge1
    /interface bridge port add interface=ether2 bridge=bridge1
    

    Final Thoughts

    When we have already configured, we can test connecting to our phone. SSID = MikroTik-WiFi

    How to configure wireless on Mikrotik router

    MikroTik routers offer powerful wireless capabilities that can be easily configured for secure, high-performance networking. You can deploy in a small office or at home. Setting up wireless via Winbox or CLI gives you full control over your Wi-Fi environment.

    🔗 Looking to buy MikroTik products?
    If you’re planning to upgrade your router or expand your network, consider buying through our Amazon affiliate store. You’ll find a curated selection of MikroTik routers, access points, and accessories. Your purchase helps support our content at no extra cost to you.

    The TP-Link Archer BE6500 Dual-Band Wi-Fi 7 Router is also known as the Archer BE400. It is designed to deliver cutting-edge wireless connectivity for home users. TP-Link manufactures this router. It is a reputable name in networking technology. The router is built to support the growing demands of modern households with multiple devices. With its Wi-Fi 7 capabilities, it aims to provide high-speed internet access. It offers extensive coverage and robust security features. These elements ensure a seamless online experience.

    Appearance and Design

    The Archer BE6500 features a sleek, modern design that easily fits into any home decor. The router is predominantly black with a matte finish that gives it a sophisticated look. It is equipped with six high-performance antennas that can be adjusted for optimal signal strength and range. The overall aesthetic is clean and understated, making it an unobtrusive addition to your living space. The layout of ports on the back is well-organized, facilitating easy connectivity for a variety of devices.

    Key Features and Specifications

    • Wi-Fi 7 Technology: Supports Multi-Link Operation, Multi-RUs, and 4K-QAM for enhanced performance.
    • 6-Stream Dual-Band: Offers a total bandwidth of 6.5 Gbps, with speeds of up to 5764 Mbps on the 5GHz band and 688 Mbps on the 2.4GHz band.
    • Wide Coverage: Covers up to 2,400 sq. ft. and connects up to 90 devices simultaneously.
    • 2.5 Gbps Ports: Includes 1x 2.5 Gbps WAN/LAN port and 1x 2.5 Gbps LAN port for ultra-fast wired connections.
    • HomeShield Security: Provides comprehensive network protection and IoT security features.
    • EasyMesh Support: Allows for seamless integration with other EasyMesh-compatible devices.
    • Easy Setup: Quick installation process via the TP-Link Tether app.

    Experience Using the Product

    Setting up the TP-Link Archer BE6500 was straightforward. It took only a few minutes through the user-friendly Tether app. The app is available on both Android and iOS. Once connected, the performance was impressive. Streaming 4K content, online gaming, and large file downloads were smooth and virtually lag-free, even with multiple devices connected simultaneously.

    The extensive coverage of 2,400 sq. ft. allowed for reliable connectivity throughout my home, including areas that were previously dead zones. The advanced features such as Multi-Link Operation ensured stable and fast connections. This capability is especially beneficial for households with heavy internet usage across various applications.

    In various scenarios, such as working from home or hosting a family movie night, the Archer BE6500 performed exceptionally well. The parental controls and security features provided peace of mind, making it ideal for families with children.

    Pros and Cons

    Pros:

    • Exceptional speed and performance with Wi-Fi 7 technology.
    • Wide coverage area suitable for large homes.
    • Easy setup and management via the TP-Link Tether app.
    • Comprehensive security features to protect home networks.
    • Supports a high number of simultaneous connections.

    Cons:

    • May be overkill for smaller households with fewer devices.
    • The design, while sleek, may not appeal to everyone.
    • Some users may find the need for additional cooling solutions in high-performance scenarios.

    Conclusion

    [content-egg-block template=offers_logo_shipping]

    The TP-Link Archer BE6500 Dual-Band Wi-Fi 7 Router (Archer BE400) is an outstanding choice. It is perfect for those seeking a high-performance router. This router can handle the demands of modern home networks. It offers impressive speed. It provides expansive coverage. Its robust security features ensure safety.

    These attributes cater well to a variety of internet needs, from streaming to gaming. It may be more than what smaller households require. However, its capabilities make it worthwhile for tech-savvy users or larger families. I highly recommend this router for anyone looking to upgrade their home networking experience.